Tuesday, June 10, 2014

Setting out for building wall construction.

Building wall construction required bricklayer to do a simple setting Out. How to do this setting out?
Below are steps that needed.

1. Study the Architectural construction drawing.


2. Do the measurement as specified on the drawing and mark every single point  (Both Upper and Lower Point).


3. On the lower ground Mark Continuous line from one end (earlier mark done at step 2) of the proposed wall to the other end of Proposed wall (earlier mark done at step 2).

4. By using Plumbob, Hang two (2) vertical tread for each end of the proposed wall. Make sure the tip of plumbob hang straight on top of the lower mark which is on the ground floor or lower floor where the proposed wall going to be build.

5. Tie a horizontal tread on both vertical tread. make sure that this horizontal tread is moveable and not too loose until it cannot stay on position when it is moved up and down to a new desire possition along the vertical tread.


4. Start lay your wall when all of this guide line/tread is fixed and practically working.

The tread is useful to ensure that the wall is build with a vertically Straight and horizontally straight unless the wall is designed to certain pattern.

When doing Setting out for a wall you will need this basic hand tool and consumable Material
a) Hammer 

b) Tread

c) Measuring Tape

4) Maker ( Pencil / Pen )
5) Nail

6) Chalk liner

 7) Plumbob.

Monday, June 9, 2014

Safety and Health Costing in Construction

Safety and health is an important field by itself. The term safety and health do not only applied for certain industry but in everyday task that we undertook. Safety and health issue need and have to be emphasised even if we are at home.

May be we do come across in our construction contract especially in our bill of quantity there is no specific item that mentioned on safety and health. However sometimes it is clearly spell  out in our general condition of contract or standard condition of contract that we need to provide safety and health precaution or equipment for the whole duration of the contract. Hence we are also required to fulfilled this term and condition of the contract once we signed and agreed to undertake the project. Even though it is not spell out in the bill of quantity we still need to allow some cost to cover this area.

Another clause that will always relate back to this safety and health issue is, we are required to adhere to all statutory and regulatory requirement and also local authority requirement. This statement seems to be very general but it might have the same impact as the item listed under our bill of quantity and contract drawing. Let say local authority required us to do protective measure to public safety and health when we are working within their jurisdiction, hence we need to comply to that requirement. However this does not appear as an item inside the bill of quantity. Hence, how are we going to cope with this cost?.What we can do is either to insert it elsewhere inside any item inside the bill of quantity or sometime there is always an item that is spell out as ..." Others:........." which I believe this can be use to insert the cost for Safety and Health.

Let we take a glimpse of how much could this safety and health could cost us. For example we had been awarded a construction project of worth of $30 Million ( Thirty million) with the construction duration of 12 months. According to our Board of construction Industry, all project that cost $20 million and above, a Safety and Health Officer must be appointed. Therefore we need to fulfil this requirement. Hence part of the cost in safety and health is the Safety and health Officer salary. By ordinary man terms, Salary is inclusive of any benefit that must be provided for an employee.In total how much will be the salary. let assume that salary for a Safety and health officer is $7000 per month inclusive of all benefit that he is entitle for under the law. Hence in total, salary alone will cost $84,000.00. how about other safety equipment that we need to provide. The most basic is Personal Protective Equipment (PPE). How about others equipments or signages that we need to install or erect throughout the construction period? In the end, the safety and health will cost us more than $84,000.00.

Why do we need to allow the safety and health cost inside our construction cost? By doing so our construction cost that we going to offer will not going to be competitive. Lets ask back to ourselves. If  I do not allow any cost for this and incident or accident at work place happened, where will I find the money to cover the damages cost? The second question is how about, if the accident happened to myself due to my own negligence for taking lightly the issue of safety and health, will i be able to continue with my work? let we keep the answer closed to out heart. Safety and health is not about making money but it is about our very own daily survivor. Therefore be careful of this safety and health at work place issue. It can happen to any of us.

If it still occurred at our construction site and we already take all necessary action that deem practical and fit to our working environment, than we have to accept is as our fate. But the rules is always about who's fault is it?. Do not let the expert telling us it is our fault and we are liable for this negligence.

Each country or state have their own set of rules that we need to adhere with. Hence for our own good, comply to it.

The photo is not belong to Construction2u.blogspot.com. It can be find and view at from http://www.documentingreality.com/forum/f10/fatal-work-accidents-25565


Thursday, May 29, 2014

Construction and OpenOfice Free software.

Today reality, everyone are keen to keep the cost as minimum as it can be. The idea by doing so is, increasing profit from their operation. What does this mean to us as person involve in construction? It simply meant that if I can reduce my cost in delivering my contract successfully, I will be competitive enough to secure more project. As a result, there will be increase in Income. However in construction it is not only about the efficiency in physical construction but also the indirect supporting tools that we use.

Why OpenOffice? OpenOffice is an computer software which functioning as Microsoft office product. It have different type of software such as OpenOffice Calc which do the similar work like excel, OpenOffice writer can serve the purpose of the MS word and OpenOffice impress can do the same presentation like MS Powerpoint.

What so special about Openoffice? Its free to download and use. With this condition, we don't have to spend much money to purchase the software.


Wait. However there is some limitation in using this OpenOffice. You might facing problem with those who does not use OpenOffice especially if you want to share or distribute digital soft-copy of your works. before you share you works save the file as excel file to enable those that are using MS excel be able to open the file and edit it if necessary.

Best of all to those construction that want to minimized the cost on the the computer aided software. It might not be significant. but the bottom line is cost saving.(if possible)

Sunday, May 4, 2014

Construction manager delegation of power

cConstruction manager or project manager is an important element for any construction field. Thus, it is important for them to be available at all time during construction period. However in real life, everybody need sometime to rest or leave for what ever reason. In view of this situation, it is always a good practice to perform "power delegation" procedure. This is a procedure to authorised a competent personnel to take over the manager duty when ever he or she will be on leave for a substantial period of time such as one week. Most of the construction company only make known the delegation of power to the person affected but in most cases they fail to notify other organisation on the issue. This scenario seems to be only a minor matter any it would not affect the construction work but it do affect the works if drastic or urgent decision is required in which the decision only can be make by authorised personnel. Hence any delegation of power shall be make official and all organisation that involved shall be officially inform.

The content of the delegation of power shall clearly stated the name of the person that will take over the responsibility, his scope of work and his limit of authority. If required may be the period he or she be in power also shall be stated.

Tuesday, April 22, 2014

Critical Path Calculation

How to determine “Critical Path” in a project ?
To determine “critical Path” in a project  required:-

  • Knowledge in the sequence of every task until completion of the project.
  • “Start” and “ Finish” date need to be pre-determine base on current available resources or planned resources for the project.
  • Calculation on the Numbers of float days for individual task and also Numbers of Total float days for each of single path or series of task which formed a path.


Calculation on Individual Float and Total float need us to do the following  steps :-

  • Forward Pass Method ( Begin from the Start date to completion date of a project ).
  • Backward Pass Method ( Begin with the completion date to Start date).
  • Individual Float Calculation required the Information on the Early finish date and Late finish date Which can be obtain from the step 1 and Step 2.
  • Total float required us to add all of the individual float that resemble series of task to form a Path.


Individual Float calculation for a Task.


Formula : Individual Float = Late finish date – Early finish date

Example 1.
Individual Float = 28.04.2014 – 28.03.2014
=   30 days  


Example  2.
Individual Float = 28.03.2014 – 28.03.2014
=     0 days


Total Float calculation for a Path.

Formula : Total Float = Activity 1+Activity2+Activity3+Activity4


Path1 Total Float   = Individual Activity 1 + Individual Activity 2 + Individual Activity 3 +                                     Individual Activity 5
                                 = 0 + 0 + 0 + 0 = 0 days

Path 2 Total Float  = Individual Activity 1 + Individual Activity 4 + Individual Activity 5
                                 = 0 + (27.04.2014 – 18.04.2014) + 0
                                 = 0 + 9 days + 0 days = 9 days float


Critical path is the path that consist of activities with “0 days” of float.

Normally critical path when show in a chart or work program it is colored in “RED”


Further reading reference:
Critical Path Methods in Construction Practice
Critical Path Method,
Critical Path

Wednesday, March 5, 2014

How to Create A Work program with Microsoft Excel version 2010

Creating a simple work program and display it as a Bar chat is relative cheap. This can be done by doing it with Microsoft Excel. However It is very tough to display the critical path and it seems to be impossible to show the logic link between bars. Another disadvantage of this is that it might only practical and applicable to a small scale project that having not more than ten (10) activities. It is due to the complexity of the process in creating the bar chart and it is very time consuming. Below are free step by step guidance to produce a simple work program using Microsoft Excel.

Step 1.
 Open the Microsoft Excel Program and create table as picture below (table can be customized according to what information you want to display.


Step 2:
Insert your the task in the task column and task ID  in the ID column and arrange it according to level of work or in words it shall be the work breakdown code.

Step 3:
Set the DURATION column by highlighting the column and right click. The dialogue box will appear. from the dialogue box, select "format cell". I should appear like picture below.


After selecting the "format Cells", a dialogue box will appear as below.

 Now Under category, Select Number. I set the decimal point to "0" decimal places. then click OK.

Step 4:
Now start Insert Number of duration. See the following Picture.


Step 5:
In this stage or step 5, for column level as " Start " and " finish", highlight both column, Right click and select " Format cells", a dialogue will appear and under the " Category" select Date and set the " date format". See picture below.

Step 6:
After you select your date format which is shown under the "type" tab. Click "OK". Than Start by inserting the start date as per sequence of work. As a guide you can fill the sequence number base on the ID into the "Predecessor" and "Successor Column". Picture below.


For the "Start", "Finish", "Predecessor" and "Successor" column, If you are familiar with Excel Function or Formula, it is better to use the features since with that Features you can easily create links between cells. Or else you will have to fill and calculate it manually.

Step 7:
Next step is to group task under a major task. To do this, First select "Data Tab". See Picture Below.
Then, identify which is the major task. Next highlight the "Rows" which represent minor tasks that form the major task. Picture Below
 After Highlighting the minor task, Click on the " Group" Icon under " Data Tab". It will automatically display the Sheet Like picture below.
The finish product is as picture below.


After you fill in all the data you needed in the table. It is now we can start to create the " Bar Chart".

Step 8

To create the “bar Chart” , First highlight the Row and column that contained the “ Task”, “Duration”, “start” and “Finish”. Next, Click on the “Insert tab” , then go to “ bar”  then click the icon “ Stacked Bar”. See picture below.


Once you click on the icon “ Staked Bar”, a Bar chart will automatically appear in your work Sheet. It shall look like the picture below.


Step 9:
Next, in the Start and finish Column, Identified the Earliest date to start work. Right Click on that cell, then click “ format cell”. A dialogue box like below will appear.

Inside the dialogue box, under category, click on “number”. Once you click on the “number”, under the sample, you will see a set of number. In this example the number is  41703.00. This number is actually represent the date of 05/03/2014. See picture below. Write down this number on a piece of paper. After you done with this step, Click the “cancel” tab. The dialogue box will close by itself. Next, do the same thing to the last date which you are going to complete your work or task. You will need those number to customized the date axis range on your chart later on.

Step 10.

Right Click on the “X” axis and then Click “ format axis”. Refer to picture below.

After you click the “format axis” a dialogue box will appear as below.


Inside the axis option check the minimum value to fixed and insert the number for start date which you write down earlier  in step 9. Do the same for maximum Value but inset the number which will represent the last completion date of the work.
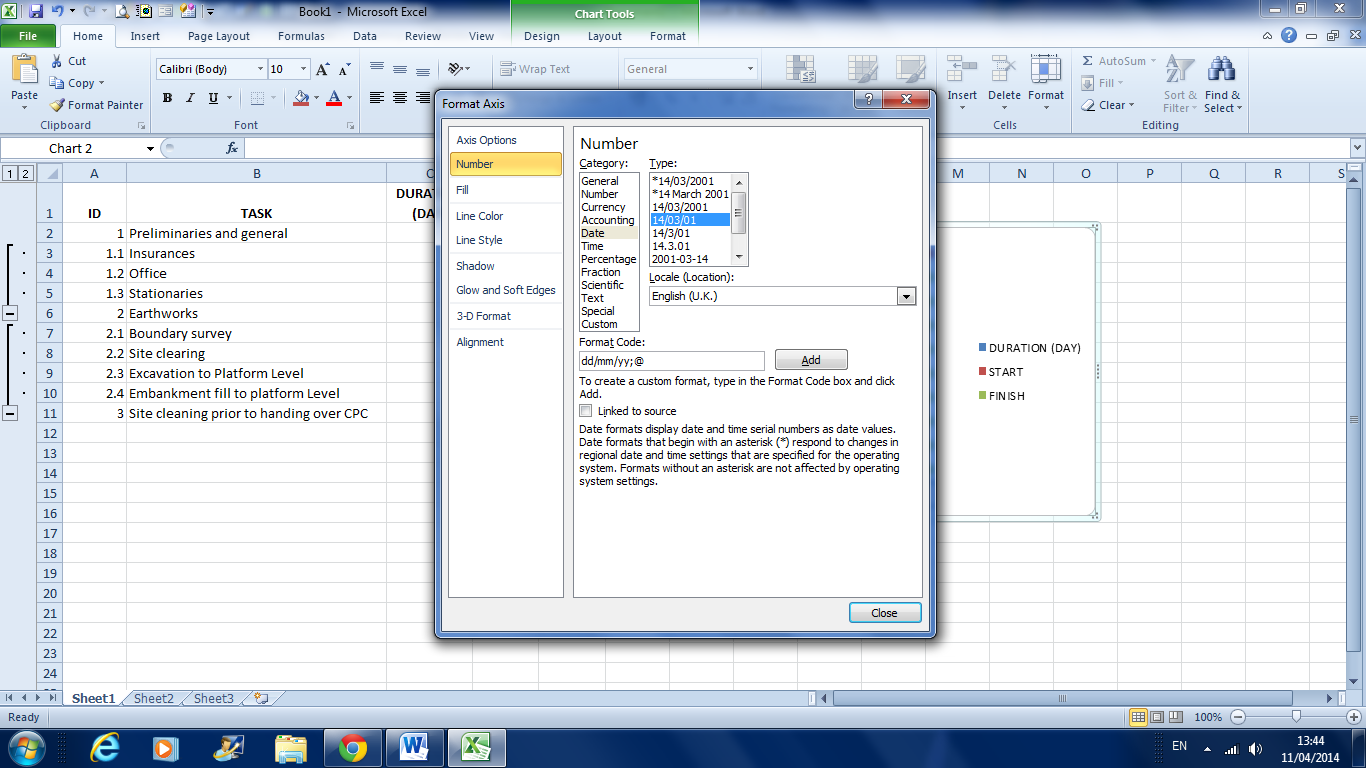
Still on the dialogue box, click on the number, then go to the category And choose “ date” and choose the date format type which you want to display on your chart. After that step, you can choose the alignment tab in the dialogue box to align the position of your date. See Picture below.


One you done with it, click “Close”. Your Chart Should appear like this.


Step 11
Right click on the “Y” Axis and click Format Axis. A dialogue box like below will appear.


Inside this dialogue box, look for the “ Category in reverse order”.  “Checked “ the box and next Close the dialogue. Your chart should be displayed as below.


Step 12
In the Chart, Right click in between two bars. Then Click “select data” . See picture below.

One you had click on the “select data” a dialogue box as below will appear.

Click on the “Duration” follow by clicking on the “move down” button. This will change the position of your “Duration”.  Once you done with that, Click “ OK” tab. It will close the Dialogue box. This action will make your Chart look as this following picture.


Step 13
Still on the chart. Right Click on any of the green bar. 

Then, click on the “fill colour” icon. Picture below.

Choose the “no fill” . Your chart should be as follows.

Repeat this step 13 but now do the same for the bar that is “red” in colour.The end product for this step  shall be displayed as below.


Step 14
Now identify the “Critical Path” and recoloured it into red. You should have a Bar chart as below.


Step 15
If you want to show both “ Start” and “ Finish” date, Click on the bars that represent the “Start” bar
 (already recoloured with no fill in step 13),then click the “ Add data level’. 


Your chart will look like this.

Now the start date had been inserted. However the date been displayed and overlap with other information. We don’t want this display. Hence we need to re format the “ X “ axis. To Do That we need to change the Minimum Value and the maximum value of “X” Axis. See the pictures below.  For Minimum value, entered value that is less than 41703 and for Maximum Value entered number greater than 41848.


Next, for the “finish date” do the same procedure as what had been done for “ Start Date”  but for  “ the Finish date” click on the “finish Bar” which had been recoloured earlier with “No Fill”. Your end product shall be displayed as follow.

Basically, Your work program created with Microsoft Excel is now completed. However  for a better presentation of Your  Bar Chart, you Can present it as Chart on its own or you can rearrange is such a way  to be display with full description.

a) Bar Chart represent the work program  on its own.


b) Work program with full description.


Congratulation. You just finish creating the work program by using Microsoft Excel.